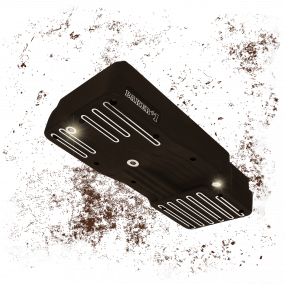
Baker Drivetrain 1 Piece oil pan
27 Jun


Baker Drivetrain + 1 oil Pan installation
FEATURES
- 1 piece Cast A356-T6 Aluminum
- Reduces engine oil temperature by 10 degrees on an 80 degree day
- Multiple integral baffles eliminate the stock plastic baffle with springs.
- BAKER +1 Pan has the feed located in the rear and return in the front for more complete system circulation.
- Structurally located integral boss for Alloy Art TXR stabalizer.
APPLICATION:
- 1993 – 2008 FLH MODELS
SKILL LEVEL:
As with most things in life there is no substitute for skill and experience. It is highly recommended by BAKER Drivetrain that when performing this task or any task related to the Drivetrain components on your motorcycle, that you refer to your Factory Service Manual for your specific model of bike.SOME HAND TOOLS AND shop supplies REQUIRED:
- 5/8” wrench or socket
- 3/16” Allen Socket
- Torque Wrench
- 3/16” Allen
- Transmission Fluid - BAKER recommends: Spectro 75W 140 for best performance. other options are: Belray, Redline, or H-D transmission fluid.
- Motor Oil (20W50)
- Blue Thread locker
INCLUDED PARTS

The following parts are included as shown in Figure 1.
ITEM | QTY | P/N | DESCRIPTION |
| 1. | 1 | 26077-99A | Gasket (H-D) |
| 2. | * | BD-5QTP | Oil Pan, Polished |
| 2. | * | BD-5QT | Oil Pan, Black |
| 2. | * | BD-5QT | Oil Pan, Silver |
| 3. | 10 | 25C350KCSS/P | ¼”-20 x 3 ½ SHCS S.S |
| 4. | 2 | 25C300KCSS/P | ¼”-20 x 3 SHCS S.S. |
| 5. | 2 | 22H-SO5M | Hex Zero Leak Drain Plug |
| 6. | * | MM32-042 | Elbow Fitting |
| 7. | * | 45893-99 | 3/8” NPT Plug |
Preparation and dissassembly:
PREPARATION
Support motorcycle on a proper lift or jack. Take extra precautions to make sure motorcycle stays stable and stationary. For your safety place motorcycle in 1st gear.
DISSASSEMBLY:
| 1. FOR YOUR SAFETY, DISCONNECT BOTH BATTERY CABLES (FAILURE TO DUE SO COULD RESULT IN PERSONAL INJURY). |
3. Remove your rear wheel following the Factory Service Manual using proper safety precautions and tools.
4. Some models and or aftermarket exhaust systems might have to be removed in order to remove rear wheel/pivot shaft bolt.
5. With the rear of the motorcycle in the air; rear wheel removed, place a block of wood or two under the motorcycle frame toward the rear (a couple of 4x4’s will work well) to enable you to lower and remove the jack while keeping the motorcycle raised in the rear.
6. Place the jack under the motor with a small block of wood (small enough so it just contacts the bottom of the motor not the frame).
7. Remove your swing arm pivot shaft ¾ of the way or enough to clear the transmission tail section following your Factory Service Manual.
8. Raise the jack under the motor until the tail shaft of the transmission is about an inch above its original location. This will give you the necessary room for removal and installation of the oil pan.
| TAKE PRECAUTION WHEN RAISING THE MOTOR AND TRANSMISSION TAIL SECTION THAT YOU DO NOT BIND OR KINK ANY CONNECTORS OR MOTOR MOUNT LINKAGE. |
| FAILURE TO TAKE PRECAUTIONS WHEN LOWERING THE MOTORCYCLE, OR MOVING JACKS COULD RESULT IN GREAT PERSONAL INJURY. MAKE SURE MOTORCYCLE REMAINS STABLE WHEN PREFORMING TASKS. |
Preparation and installation:
BAKER + ONE OIL PAN PREP:
The BAKER + 1 Pan comes ready to install, please follow these steps to ensure proper installation.
| 1.Check for any debris inside the oil pans from shipping. |  Figure 2. |
| the oil pan must be clean of all debris to avoid engine damage.Take a blow gun and blow through the pick up tube to ensure no debris is present. |
| 2. Clean gasket surface area on transmission with brake cleaner or suitable cleaning solvent. |
INSTALLATION:
| 1. Install the oil pan with stock gasket (p/n 26077-99A). See Figures 2 and 3. Apply Blue Thread Lock to all bolts. Bolts 1,2 (14-20 x 3” SHCS) and 5, 6 (1/4-20 x 3”SHCS) might have to be held into position while installing pan in order to clear the frame crossmember. Refer to Figure 3. |  Figure 3. |
|
2. Start the 4 bolts held into position during install by
hand, making sure the gasket is aligned. This will hold
the pan and gasket in position. 3. Install the remaining eight 1/4”-20 x 3 1/2” SHCS with blue thread lock. 4. Snug all bolts to 110 in-lbs following the torque sequence shown in Figure 3. |
installation:
|
6. Lower the jack to realign the swing arm and transmission tail shaft. 7. Install the swing arm pivot bolt following the Factory Service Manual. 8. Install the rear wheel following the Factory Service Manual. 9. Fill transmission with 20-24 fl oz for 1993-2006, or 32 fl oz for 2007-newer, with transmission fluid. Fluid can be checked by removing the oil level plug. 10. Fill oil pan with 20w50 HD oil or customer preferred oil. Check oil level and add as required following your Factory Service Manual. 11. Install exhaust system if removed. |
Once the maiden voyage had been made around the block or down the road. Take the time to double check all fasteners for tightness. Also with the bike as close to level as you can safely get it, and the transmission fluid / oil warmed up, double check the level of the fluids. Top off if necessary.


